|
No hay comentarios de productos.
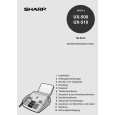
UX-510TH FO-1460TH
3Take the new film out of its package, and insert two of the gears
� Do not yet remove the band which holds the spools together.
provided with the fax into the ends of the spool with film. Make sure that the two tabs on the gears fit properly into the slots in the ends of the spool.
7Insert the empty spool into the back of the compartment so that the
gear and the flange fit into the slots on the sides of the compartment. � Make sure that the gear engages with the gear below it.
4Hold the empty spool so that the end with only one slot is on the left,
and lower the spools into the front of the printing compart-ment. The gears in the ends of the spool with film should fit into the slots on each side of the printing compartment.
2 tabs
8Wind the film slightly (rotate the gear on the right side of the empty
spool) so that there is no slack in the film. Make sure that both edges of the film wind onto the spool evenly.
5Cut the band which holds the spools together with scissors, and re1 tab
move it. Insert the remaining gear into the right end of the empty spool and the flange into the left end of the empty spool. Make sure the tabs on the gear and the flange fit into the slots in the ends of the spool (the gear has two tabs and the flange has one tab).
9Close the print compartment cover, making sure it clicks into place.
� Caution! Close the cover slowly to make sure it doesn�t pinch your fingers.
Flange 2 tabs Gear
FIf you replaced the film, initialize the new film by pressing the
FUNCTION
6Pull the empty spool toward the back of the compartment, unwinding the film as you pull.
FUNCTION key, the "6" key, and the "#" key on the operation panel. Make sure that INITIALIZE FILM appears in the display, and then press the START key. (Do not perform this step if you installed the initial sample roll of film.)
6
START
1�5
|