|
|
|
Productos
|
|
Información
|
|
Destacado
|
|
|
 |
|
|
No hay comentarios de productos.
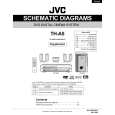
TH-A5
<DVD mechanism assembly section>
Removing the DVD loader board (See Fig.1 to 3)
Prior to performing the following procedure, remove the top cover and DVD mechanism assembly. 1. Disconnect the card wire from the connector J6 on the DVD MPEG board. 2. Disconnect the harness from the connector on the motor board. 3. Disconnect the harness from the connector J5 on the DVD loader board. 4. Remove the four screws A attaching the DVD loader board to DVD mechanism assembly.
DVD loader board DVD MPEG board J6
DVD mechanism assembly (top side)
Fig.1
DVD mechanism assembly (bottom side)
Motor board
A
CAUTION!!
(see fig.3)
Before removing the card wire which connects the pickup board and DVD loader board, solder the two soldering parts and make it short-circuit. Moreover, while having removed the card wire, don't remove these solder. 5. Disconnect the card wire from the connector U9 on the DVD loader board. ONE POINT How to eject the DVD tray manually (see fig.2) The white lever of the mark is moved in the direction of the arrow. Then, the tray will be opened. Moreover, the tray is separable from a DVD mechanism assembly by removing two screws of the mark (see fig.1) and drawing out the tray.
U9
J5
Connector
Fig.2
Pick up board
Soldering parts
Motor board
DVD loading mechanism
Fig.3
Removing the DVD loading mechanism (See Fig.4)
Prior to performing the following procedure, remove the top cover, DVD mechanism assembly and DVD loader board. 1. Remove the two screws B and remove the bracket. 2. Remove the one screw C fixing the DVD loading mechanism. 3. Move the lever in the direction of the arrow X. 4. Remove the DVD loading mechanism from the DVD mechanism assembly by moving it in the direction of the arrow Y.
B X
Lever
DVD mechanism assembly (bottom side)
Bracket
DVD loading mechanism
Y C
Fig.4
1-9
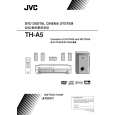 $4.99 TH-A5 JVC
Manual de Usuario Manual del propietario completo en formato digital. El manual estará disponible para descarga como …
|
|
|
> |
|