|
No hay comentarios de productos.
CHAPTER 4. OTHERS 4-1. Replacing the CPU
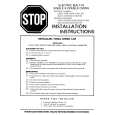
1. Removing the CPU
1 Insert a flat-blade screwdriver into the notch as shown in the illustration and rotate it so that the protrusion comes to the lock release position. 2 Pull the CPU gently upward to lift it out of the CPU socket.
1
1 CPU Lock position 2
Lock release position
CPU socket
2. Installing the CPU
1 Align the triangle reference mark of the CPU with that of the CPU socket and insert all the pins of the CPU to the corresponding holes of the CPU socket. 2 Insert a flat-blade screwdriver into the notch as shown in the illustration and rotate it so that the protrusion comes to the lock position.
2
2 CPU Lock release position Reference marks
1
Lock position
CPU socket
NOTE: Rotate a flat-blade screwdriver to the lock position securely. If not, the operation of the CPU may become unstable.
Confidential
4-1 (END) PCG-GRV670/GRV680 (AM)
|