|
|
|
Productos
|
|
Información
|
|
Destacado
|
|
|
 |
|
|
No hay comentarios de productos.
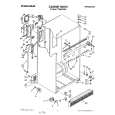
Removing and cover
meat drawer
NOTE: If the support needs adjustment, turn base clockwise to raise; counterclockwise to lower. (See diagram below.)
To replace cover: 1. Fit cover notches into supf~~ts on of refrigerator.
Lower cover into place.
Walk
Models TTl6CK and TT18CK To remove: 1. Slide meat drawer out to the guide stops. 2. Lift the front of meat drawer until it clears stops. Slide drawer out the rest of the way. 3. Lift cover straight up and out. To replace: 1. Fit notches in cover sides over center shelf support. 2. Lower cover into place. 3. Fit edges of drawer into supports on cover. 4. Slide meat drawer into place. Models TT20AK and TTPOBK To remove: 1. Slide meat drawer out to the guide stops. 2. Lift the front of meat drawer until it clears stops. 3. Slide drawer out the rest of the way. 4. Tilt cover front up. 5. Lift up at back until it releases. 6. Pull straight out. (Be careful-glass is heavy!) To replace: 1. Guide rear hooks of cover into the shetl supporl slots. 2. Tilt rover front up until hooks drop into slots. Lower front of cover to a level position. 3. Replace meat drawer in reverse order.
2. Insert cover support (with long tab tpward the front) into the groove on the underside of the crisper. NOTE: lf the support needs adjustment, turn base dockwise to raise; counterclockwise to lower the support. (See diagram at left.) 3. Slide back of glass insert into place; then lower the front. Models lT2OAK and lT2OBK To remove crispers: 1. Slide crisper straight forward to the guide stops. 2. Lift front until it clears stops. Slide crisper out the rest of the way. 3. Replace in reverse order. To remove cover: 1. Push up glass insert from the bottom, then slide out with both hands. (Be careful-the glass Is heavy!) 2. Lift front of cover frame by pulling up and out. 3. Remove horizontal metal cover support bar. To replace cover: 1. Replace metal cover support bar on wall supports in front section of cabinet. 2. Fit back corners of cover frame into notch supports on walls of refrigerator. then lower into place. 3. Slide back of glass insert into place; then lower the front.
Removing crispers crisper cover
Models lT14CK To remove:
and
and lT16DK
1. Slide crisper straight forward to the guide stops. 2. Lift front until it clears stops. Slide crisper out the rest of the way. 3. Replace in reverse order. To remove cover: I. Lift front and remove cover support. 2. Lift cover up and out. To replace cover: 1. Fit cover notches into supports on walls of refrigerator. Lower front into place. 2. Insert cover support (with long tab toward the front) into the groove on the underside of the crisper cover. NOTE: If the support needs adjustment, turn base clockwise to raise; counterclockwise to lower the support. (See diagram above.) Models lT16CK and lTl8CK To remove crispers: 1. Slide crisper straight forward to the guide stops. 2. Lift front until it clears stops. Slide crisper out the rest of the way. 3. Replace in reverse order. To remove cover: 1. Push up glass insert from the bottom, then slide out with both hands. (Be careful-the glass is heavy!) 2. Lift front of arver frame and remove cover support. 3. Lift cover frame by pulling up and out.
Removing
trivet and cover
Removing
freezer shelf
Models TTl4EK and lTl8EK The trivet can be removed for easier cleaning. To remove trivet: 1. Lift front of cover frame and remove cover support. 2. Lift trivet from the support brackets on the back wall. 3. Replace in reverse order. Be sure to replace trivet with higher edge toward rear of refrigerator. To remove cover: 1. Lift front and remove cover support. 2. Lift cover up and out. To replace cover: 1. Fit cover notches into supports on walls of refrigerator. Lower front into place. 2. Insert cover support (with the long tab toward the front) into the groove on the underside of the crisper cover.
Models lTl6CK, lT16DK, lT1 BCK, TTSOAK and m2OBK To remove: 1. Lift front slightly. 2. Lift back off supports. 3. Replace in reverse order.
Removing
the base grille
Models ll2OAK and ITSOBK To remove: 1. Open the refrigerator door. 2. Pull grille outward. 3. Do Not remove Tech Sheet fastened behind grille. To replace: 1. Line up grille support tabs with metal clips. 2. Push firmly to snap into position. 3. Close the refrigerator door.
Page 7
|
|
|
> |
|