LER7646EQ1 Quantity: 1
$4.99
» View Details
KEY004/17 Quantity: 1
$4.99
» View Details
HR-J83MS Quantity: 1
$4.99
» View Details
DBR-S220I/NYXK/IT Quantity: 1
$4.99
» View Details
EUR501374 Quantity: 1
$4.99
» View Details
MX-GA3VAS Quantity: 1
$4.99
» View Details
KHWS160JMY2 Quantity: 1
$4.99
» View Details
TX28XD4F/A Quantity: 1
$4.99
» View Details
AKZ126/WH Quantity: 1
$4.99
» View Details
ESZ 4466 WS Quantity: 1
$4.99
» View Details
LE6400XSW0 Quantity: 1
$4.99
» View Details
KXFW1010 Quantity: 1
$4.99
» View Details
GSIP 6998/1 ST Quantity: 1
$4.99
» View Details
DTF-2950-100D Quantity: 1
$4.99
» View Details
CDC775/00G Quantity: 1
$4.99
» View Details
SOLAR A Quantity: 1
$4.99
» View Details
2ART2NGCKB00 Quantity: 1
$4.99
» View Details
LSR7233DZ0 Quantity: 1
$4.99
» View Details
EXP2460/00 Quantity: 1
$4.99
» View Details
BC6318 Quantity: 1
$4.99
» View Details
SZD25NW Quantity: 1
$4.99
» View Details
HDD6330/17 Quantity: 1
$4.99
» View Details
HTZ-252DV/LFXJ Quantity: 1
$4.99
» View Details
BMZP 4005 IX Quantity: 1
$4.99
» View Details
RCS2012LS0 Quantity: 1
$4.99
» View Details
830341 Quantity: 1
$4.99
» View Details
ALPHA-CENTER Quantity: 1
$4.99
» View Details
HOB 492/B Quantity: 1
$4.99
» View Details
RF385PCWW1 Quantity: 1
$4.99
» View Details
VR62216 Quantity: 1
$4.99
» View Details
Electramac MC MES 16, Euro plug, 1600W, Mr. Bricolage Quantity: 1
$4.99
» View Details
GSI 5510 WS BK Quantity: 1
$4.99
» View Details
VGNB90PS Quantity: 1
$4.99
» View Details
WSK40K Quantity: 1
$4.99
» View Details
KD-SV3104 for AU Quantity: 1
$4.99
» View Details
KECC567KWW1 Quantity: 1
$4.99
» View Details
CTV4055/T Quantity: 1
$4.99
» View Details
ADP 1967 WHM Quantity: 1
$4.99
» View Details
SBCSC490/05 Quantity: 1
$4.99
» View Details
AWZ 8465 Quantity: 1
$4.99
» View Details
SXP520 Quantity: 1
$4.99
» View Details
FRD290W Quantity: 1
$4.99
» View Details
826.567 0/10537 Quantity: 1
$4.99
» View Details
GU1108XTLB0 Quantity: 1
$4.99
» View Details
RF315PXYW2 Quantity: 1
$4.99
» View Details
Subtotal: $224.55
 
English Polski Spanish 
Buscar un manual
 

(p.Ej. AA-V20EG JVC, ZX-7 Sony)
PayPal 1000+ rating Secure, Encrypted Checkout.
 
Productos
Información
Destacado
Inicio >> JVC >> MXDVA5 Manual de Servicio
 
 45 artículo(s) en Su carrito 

JVC MXDVA5
Manual de Servicio


¡Twitee acerca de este producto y obtenga $1.00 de crédito en la tienda para uso!
  • Contiene diagramas del circuito
  • Descargable
  • Formato PDF
  • Manual completo
  • Idiomas: English
Precio: $4.99

Descripción del JVC MXDVA5 Manual de Servicio

Manual de servicio completo en formato digital (archivo PDF). Los manuales de servicio por lo general contienen diagramas de circuitos, tarjetas de circuitos impresos, consejos para reparación, diagramas de cableado, diagramas de bloque y lista de refacciones. El Manual de Servicio (a veces llamado Manual de Reparación) es usado principalmente por los técnicos.

Si tan solo quiere saber cómo utilizar su televisión, reproductor de vídeo, reproductor de mp3, etc. Quizá lo que necesita es el Manual del Propietario. Después de colocar la orden le enviaremos las instrucciones de descarga a su dirección de e-mail.

The manual is available in languages:

Not yet ready
You must purchase it first

Opiniones de los clientes
No hay comentarios de productos.
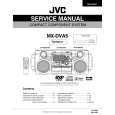
TEXT_PDF_SNIPPET
MX-DVA5

Removing the tuner board (See Fig.11 and 13)
Prior to performing the following procedure, remove the metal cover and CD / DVD changer unit. 1. Disconnect the card wire from connector CON01 on the tuner board. 2. Remove the two screws L attaching the tuner board.
CON01

Rear panel

Main board

Tuner board

Fig.13

Removing the rear panel

(See Fig.14)

Prior to performing the following procedure, remove the metal cover, CD / DVD changer unit, heat sink & Amp. board and tuner board. 1. Remove the three screws N and five screws M attaching the rear panel.

Rear panel

M N
Fig.14

Removing the main Board (See Fig. 15)
Prior to performing the following procedure, remove the metal cover, CD / DVD changer unit, heat sink & Amp. board tuner board and rear panel. 1. Disconnect the card wire from connector FCW3 and the harness from connector JCW1, JCW2, and HCW3 on the main board. 2. Disconnect the harness from connector PCW1 on the power transformer board. 3. Remove the screw G attaching the main board holder. (See Fig.8) 4. Remove the two screws O attaching the heat sink and bottom chassis.
PCW1 Power transformer board FCW3 JCW2 JCW1 HCW3 Main board

O

Fig.15

1-9

Quizás también quiera comprar

$4.99

MX-DVA5 JVC
Diagrama del circuito

Conjunto de diagramas del circuito. Los diagramas serán proporcionados en un archivo PDF. El archiv…

$4.99

MX-DVA5 JVC
Catálogo de piezas

Únicamente Catálogo de Partes. Está disponible en formato PDF. Muy útil si su equipo se ha averi…
>
Parse Time: 0.906 - Number of Queries: 264 - Query Time: 0.481