|
|
|
Productos
|
|
Información
|
|
Destacado
|
|
|
 |
|
|
No hay comentarios de productos.
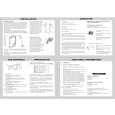
LOWER PLATE REMOVAL/INSTALLATION
REMOVAL
1. Turn the vacuum cleaner over exposing the underside. Release the lower plate by removing the two (2) screws that secure the lower plate, (Fig 1). 2. Remove the lower plate by grasping it at the back near the wheels, lift up, pivoting it toward the agitator until it releases from the slots in front. Remove any residue that may exist in the belt area.
(Fig. 1)
EXPLODED VIEW (MOTOR HOUSING, MOTOR, HANDLE, AND BODY)...
C BLOCK
C-37 C-34 C-36 C-35
INSTALLATION
1. Hook the front of the lower plate into the slots on the front of the nozzle housing. Press the lower plate down into place. 2. Replace the two (2) lower plate mounting screws. NOTE: For general servicing, it is necessary to eliminate pinching of any wire during reassembly. After servicing any electrical component or electrical enclosure, the unit should be reassembled and checked for dielectric breakdown or current leakage.
C-7 C-33
C-5
C-32
C-37 C-38
C-20
AGITATOR ASSEMBLY & BELT REMOVAL/INSTALLATION
C-19 C-6 C-12
C-2
Removal
The brushes are not replaceable separately. When the brushes need replacing, the agitator assembly, without brush supports, will have to be replaced. 1. Remove the lower plate as outlined in LOWER PLATE REMOVAL/ INSTALLATION section. 2. Remove the belt from the motor shaft by sliding it off between the end of the shaft and the nozzle housing, (Fig. 2). 3. Carefully lift up on the agitator assembly until it clears both sides of the nozzle housing, (Fig. 2). NOTE: The two (2) brush supports may come off along with the two (2) washers as you lift the agitator assembly out. Do not lose the two (2) washers. Look at the exploded view of the agitator assembly in the B Block section for correct assembly of parts. The brush supports and washers should be reused.
(Fig. 2)
C-43 C-8
C-11
C-21
C-49 C-3 C-4
C-1 C-39
C-40 C-10
C-4
C-44
C-45
C-9
C-46
C-17 C-15 C-18
C-47
Installation
1. Place the belt around the motor shaft, (Fig. 2). 2. Start the new agitator assembly back into the nozzle housing by placing the (Fig. 3) side opposite the belt partially into the slot. The small tabs should be aligned with one against the nozzle and the other against the lower plate. This will hold the agitator in place and leave both hands free to place enough tension on the belt to allow that side of the agitator to return to the nozzle housing slot. 3. Place the belt around the agitator pulley on the agitator assembly. NOTE: There is a place for the belt to fit on one end of the agitator assembly only. This is the agitator pulley. 4. Use both hands to pull the belt tight, (Fig. 3), and slide the agitator assembly firmly into the slots on each end of the nozzle housing. 5. Rotate the agitator assembly by hand to insure nothing rubs and to check for correct assembly. 6. Replace the lower plate as outlined in the LOWER PLATE REMOVAL/INSTALLATION section.
C-25 C-22 C-15 C-17 C-26 C-48 C-28 C-30 C-13 C-16 C-29
C-31 C-6
C-23 C-24 C-18
C-42 C-41 C-27
C-14
- 10 -
-7-
|
|
|
> |
|